 Big Game
Hunting in a Miniature World
Big Game
Hunting in a Miniature World
By
Jim Moerschel
His bulky body is dressed in convicts black and white stripes and
his eight eyes scan the horizon for a victim. His body suddenly tenses
And the four pairs of powerful legs move him stealthily along. It’s
obvious he has murder on his mind as his iridescent fangs glisten in the
sunlight. At the proper moment the assassin deploys a drop line as his
powerful rear legs catapult him four times his body length onto the back
of his victim. Death is swift.
This may sound like a late night monster movie, but actually
I’m looking at a spider through my cameras macro lens. I’m
standing in the field next to an old farm and a tiny spider is providing
the action on an old split rail fence.
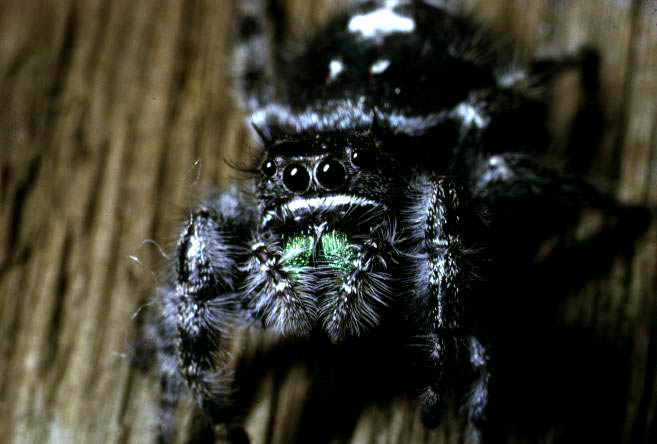
The muggers name is Phidippus, one of approximately 300 species of jumping
spiders living north of Mexico and they are among
our most attractive spiders, with bright colors and glistening scales.
They are active during the day and instead of spinning a web, they leap
upon their prey from long distances. Before making the perilous jump
these spiders secure a silk thread that acts as a safety line just in
case they miss their mark.
“Macro hunting” as I call it is a fascinating adventure. The
great thing about it is the photographer can find lots of different creatures
in
their own backyard. No need to travel to faraway exotic places. Just find
a nice swampy area, a local pond or field and then bring along the
right equipment and you are on your way to big game hunting in a miniature
world.
There are several quality macro lenses on the market. My first lens was
a Nikon 55mm macro lens purchased in 1968. I still have that
very sharp lens and occasionally use it on an old Nikkormat Ftn. Today,
the photographer has the choice of several focal lengths to capture the
tiny creatures of woods, fields and swamps.
There are 60mm, 90mm, 105mm, 180mm and 200mm macros
to do the job. My first recommendation is to purchase a lens that shoots
life size. You will find this as 1X or 1:1 on the box. This means that
you are shooting an area the same size as the film format.
The next important consideration is which focal length to purchase. The
rule is that the shorter the focal length, the closer to the
subject the lens has to be. The 200mm allows the largest distance from
the subject while maintaining large image size. This can be a big advantage
because many tiny critters will move off and hide when a
lens comes real close. Of course, the 200mm is usually very expensive.
A 105mm is a nice all round lens and it can be a great portrait lens for
people as well as a close-up lens for insects. The shorter focal lengths
are excellent for close-up work, but good stalking skills are needed so
that the photographers movements and close proximity to the living subject
won't cause alarm and a quick retreat.
Even after purchasing the macro lens of your choice, there will be times
when you wished that you could focus even closer to enlarge a really tiny
subject. This means other purchases from the local camera store. My favorite
is extension tubes. These are hollow tubes (no glass)
that are positioned between the camera body and the lens. The tubes of
today retain all the electronic features of your primary lens and give
you additional enlarging power. They usually are sold in a set of three
different lengths and can be used (stacked) or separately depending on
the situation.
Then there are diopters. These glass “filter” types screw
right onto the front of your lens. They come in “plus 1,”
“plus 2,” “plus 3,”
powers. Years ago, diopters were not as sharp as today’s models
and they serve a nice purpose in that they are very light weight, and
easily carried and stored.
Now that we have nice equipment to enter the “macro world”
let’s
get going. I can take you on some of my favorite past adventures and
explain the techniques used in capturing the image, but most importantly
I want to convey all of the thrills and fun of exploring a
world that the average person rarely gets to see.
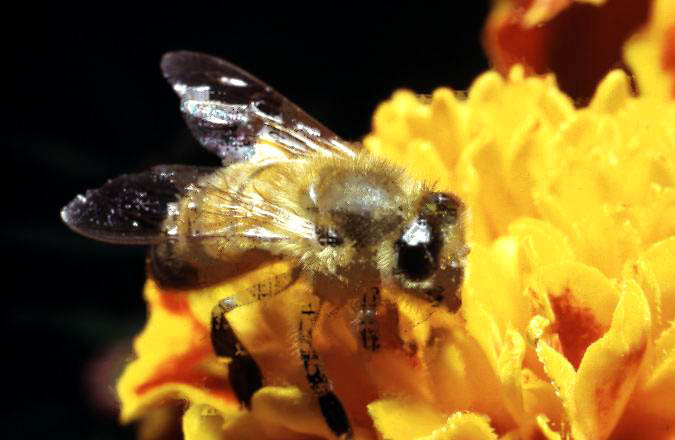
The image of the bee on a marigold was taken right after I had spent several
hours photographing tiny creatures in a large field a few miles from my
home. When I entered my backyard, I spotted a bee hovering from flower
to flower doing its wonderful job. I did recognize that this would be
truly a colorful shot if I could pull it off and began
stalking with my 55mm macro and one extension tube for greater image size.
At that time I was using a small manual flash unit mounted
on a bracket allowing the flash to aim downward onto a tiny subject. The
flash allowed for a F stop of 16. This helps increase the all important
“depth of field” situation that is inherent in extreme close-up
photography.
The bee went quickly from flower to flower and didn’t seem to mind
my close presence, so I moved in real close and when he landed
I pressed the shutter. I made several shots in a few minutes, each time
making sure the bee was sharp in the viewfinder. I knew that the f16
aperture would add depth of field ensuring a decent sharpness.
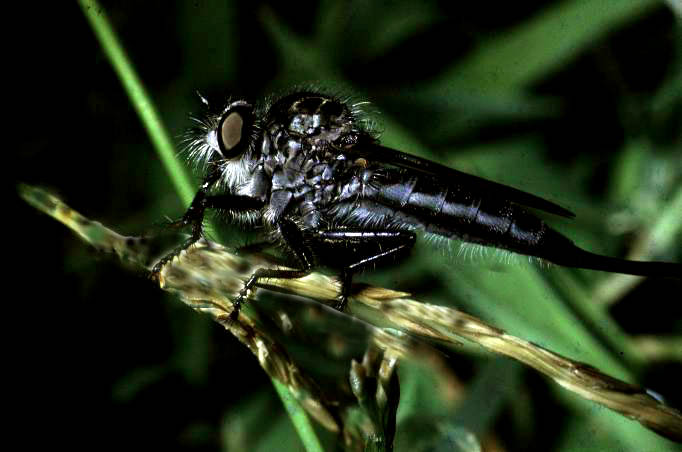
Many of my photographs are made right in my backyard. On another day I
spotted a “Robber fly” resting in the grass. I used the same
set-up as the previous “bee photo” and went to work crawling
in the grass. For this shot I wanted to come in from the side and try
to
“parallel” the entire length of the flies body. This would
ensure sharpness of the fly.
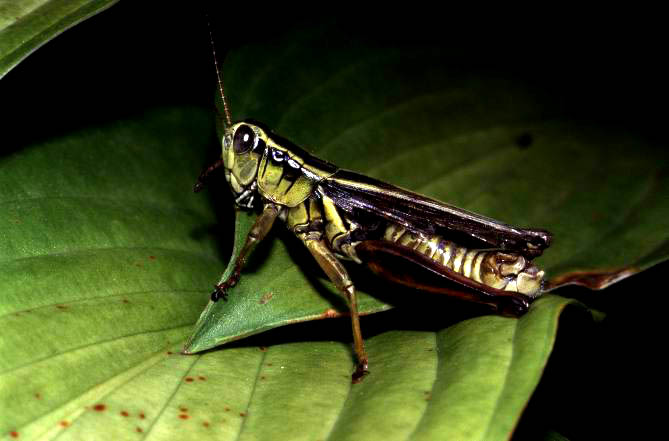
On a trip to the Smokey Mountains I found a small immature
grasshopper in the Cades Cove portion of the National Park. I was
using the 55mm lens that required me to be only a couple of inches from
the creature. By slowly pressing the camera in closer and closer until
the subject was sharp in the viewfinder I composed the scene as best I
could and pressed the shutter. The f16 stop provided nice depth of field
and I had my grasshopper.
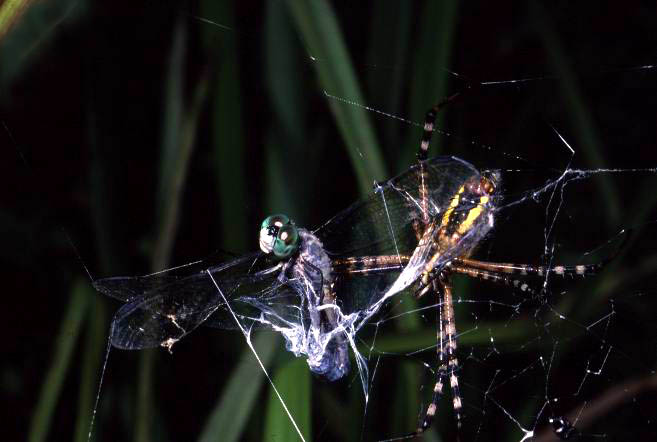
If you do this type of photography long enough you will certainly
witness the raw side of nature sooner or later. While stalking around
a
swampy pond one day, I came upon a large Argiope spider with a huge
web amongst the reeds. Without warning, a life and death struggle developed
as a dragonfly was snared. The spider wasted little time.
She raced over, staying clear of the dangerous mouth and quickly threw
a few loops of extra silk over the thrashing fly. Then she began the wrapping
process twirling her body around and around letting out silk the entire
movement. In less than 15 seconds the dragonfly was completely wrapped
like a mummy that he soon would become.
I usually keep my macro equipment “handy” when at home. This
means the camera is loaded and the macro lens with one extension tube
is mounted. This rig is mounted on the flash bracket with the flash loaded
with batteries and “ready to go.
This way, if I’m working out in the yard and spot something very
Interesting I can bring out the camera quickly and go to work. If I’m
relaxing in the yard, I have the camera out with me.
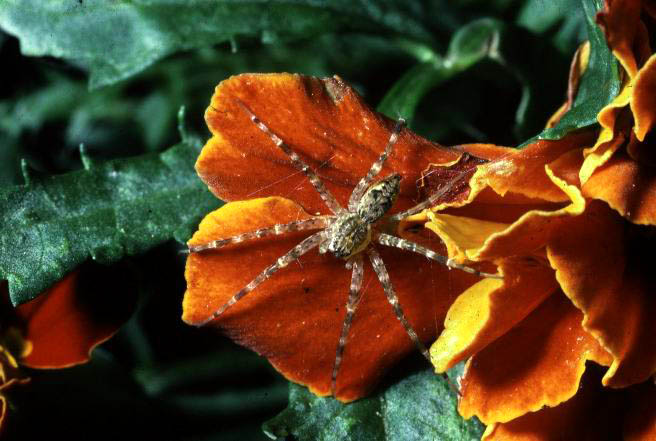
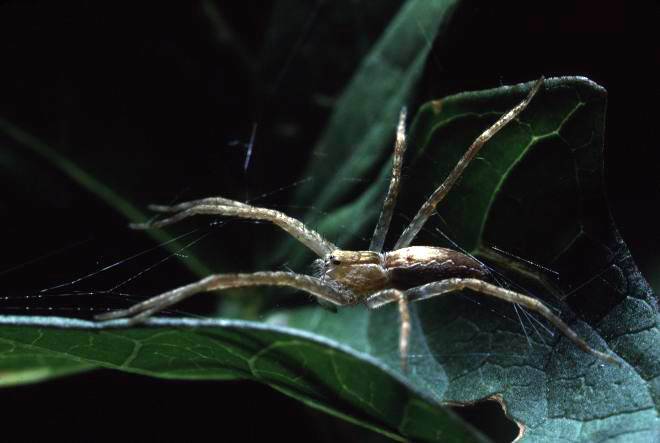
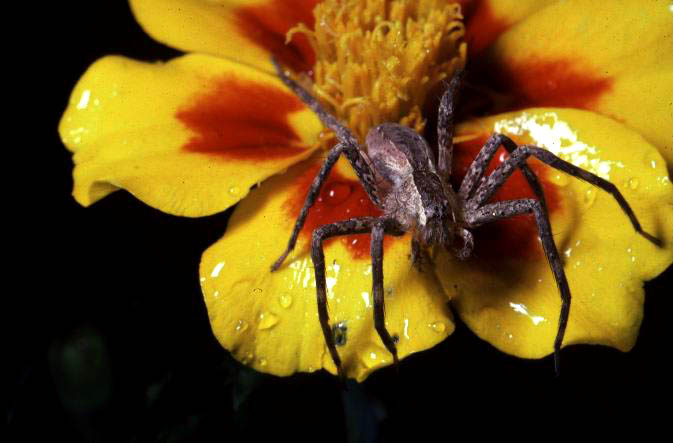
Spiders are all over my yard and become nice subjects to stalk.
In many cases I’ll find one on one of the colorful flowers in the
garden
And this provides a colorful background for the image. Most of the spiders
are dull brown, which makes them blend in with tree trunks and
The earth, but set against a yellow marigold or against a background of
green ivy they make a fine contrast.

One of the most exciting aspects to exploring with the macro lens is
To witness the daily lives and rituals of members of the miniature kingdom.
In a corner of my yard is a tangle of vines and I spotted a large ant
That appeared at first glance to be attacking a whole bunch of tiny insects.
For my photo I added an extra extension tube for greater magnification
and pressed the camera closer and closer to the ant. I made the shot.
A few weeks later, after the film was processed and I viewed the image
I did some research on ants. “Lo and behold!” There was a
photo in National Geographics that was accompanied by a story of how
Some ants “herd” aphids, just as humans would herd cows. This
is known as a symbiotic relationship – each helps the other. The
ant protects the aphid colony from predators in exchange for a “honey
dew” nectar. Finding scenes like this is what drives me to keep
probing
and exploring with the close-up lens.
For the vast majority of my shots over the years, the flash was a small
manual Vivitar mounted right above the lens, front-lighting the
subject. But, to add some spice to the photographs I’ve positioned
the flash differently to try new lighting on subjects that I already had
plenty
of stock images.
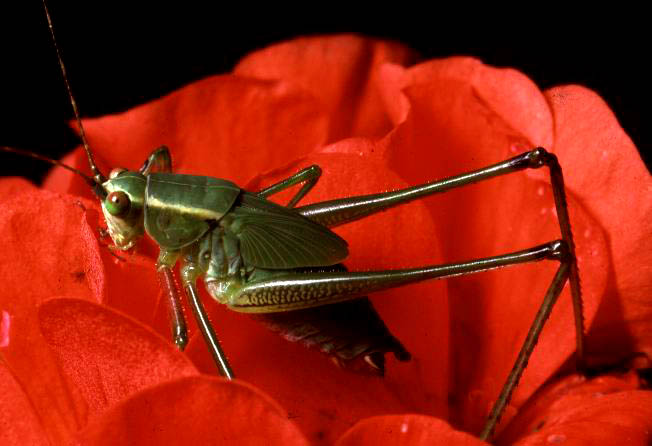
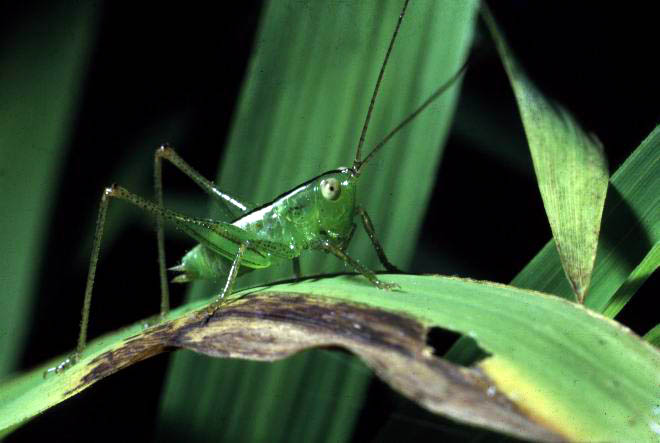
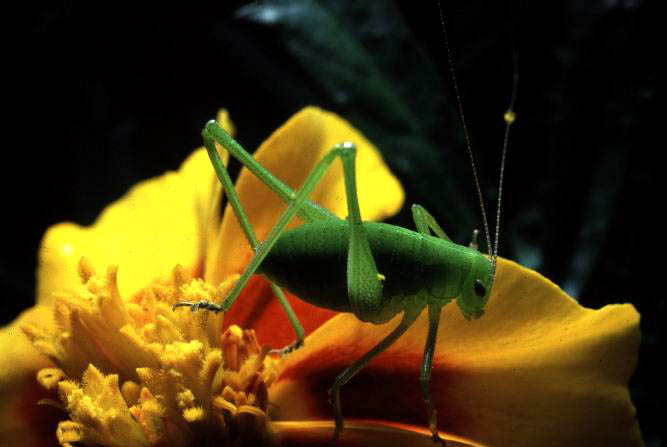
On this photo of a Katydid on a Marigold, the flash was positioned “top
rear” lighting the insect from behind. Some of the light “spilled”
over to the front anyway reflected partly by the bright flower, but most
of the light “back-lit” the tiny creature. Much of his body
is translucent so that we get to see not only a different lighting, but
also detail in the body structure that front lighting would not yield.
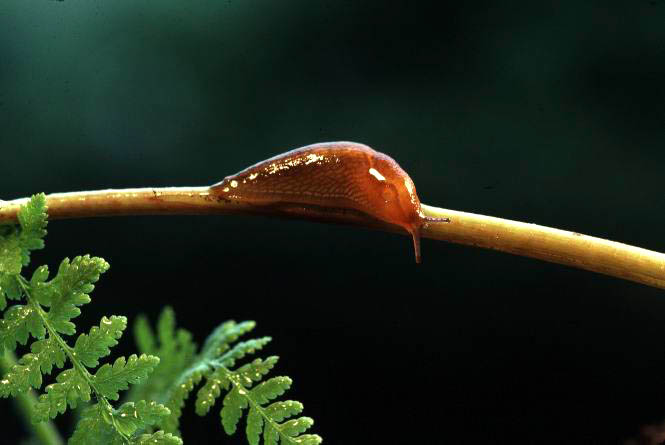
The image of the slug is done the same way. The flash being positioned
high rear that also back-lit the nice ferns growing in the foreground.
With creatures so tiny and usually on the move, it is not always easy
to get their picture and even more difficult to create a nicely composed
scene.
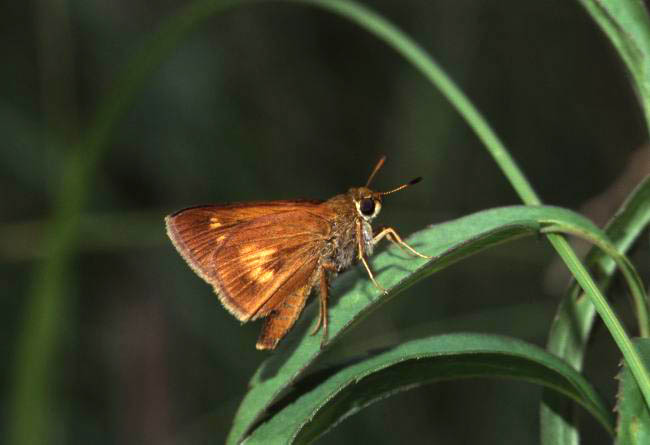
The photo of the small skipper butterfly is one of those times that the
subject perches for a moments rest in an accessible place and the
supporting elements of grasses are graceful and create a nice overall
scene. The flash was positioned high front above the lens and “splashed”
enough light beyond the butterfly into the background.
Because I had an easy “open” shot of it, I placed the butterfly
slightly
off center and the surrounding grasses framed it nicely. Most of the time
you will find that your view of the insect will be blocked by a
nuisance blade of grass, a twig right in front of the subject and awkward
angles of view to create the picture. Overcoming these challenges is a
big reward when you get some real good “keepers.”
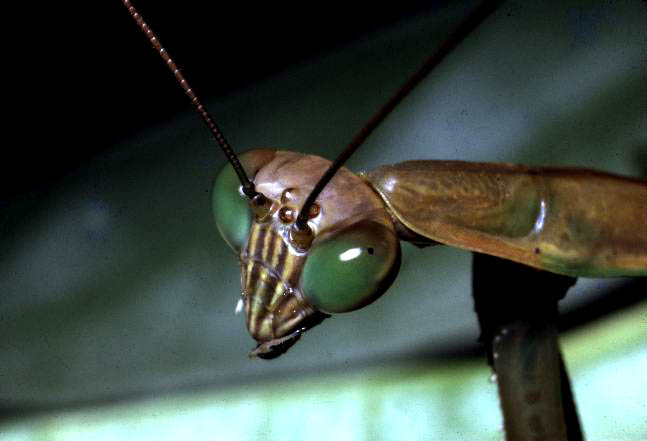
My image of the “Face of Death” necessitated stacking all
three of
my extension tubes between the camera and macro lens. I had spotted a
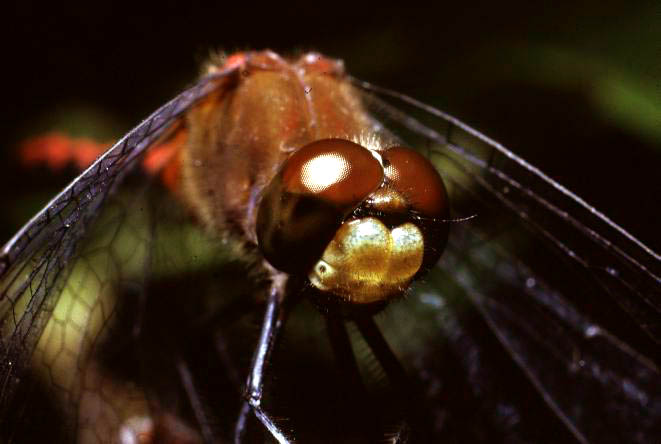
red dragonfly perched at the side of a pond, realized I needed lots of
magnification in order to magnify the head so before staking made my preparations.
The manual flash was turned on and placed just above the front of
The lens. The f stop was set at f 16 for good depth of field. Male dragonflies
usually perch near a pond and stake out their territory from
Rival males. They will return again and again to this same perch.
I walked slowly toward the dragonfly and he took off as expected.
Once out over the pond they search for an insect to eat and will come
back to their favorite spot to consume it. When he returned I was as still
as a tree. No movement at all. When he decided it was time to fly off
again, I moved closer to the abandoned perch. From this close proximity
I would be able to lean forward, press the camera up close to the fly
and focus. And that’s what happened. He returned, regarded me as
part of the scene and I just leaned slowly in and when his face became
sharp, pressed the shutter. PRESTO!!!! The FACE OF DEATH!
These are just some of the stories that evolve from going out into the
realm of nature, exploring and probing with a macro lens. The days are
fulfilling, adventurous with lots of new subjects found everyday –
right in your own backyard or down the street in a field or
pond. I wish you good luck in your “Big game hunting in a miniature
World.”